Sunday, 18 June 2017

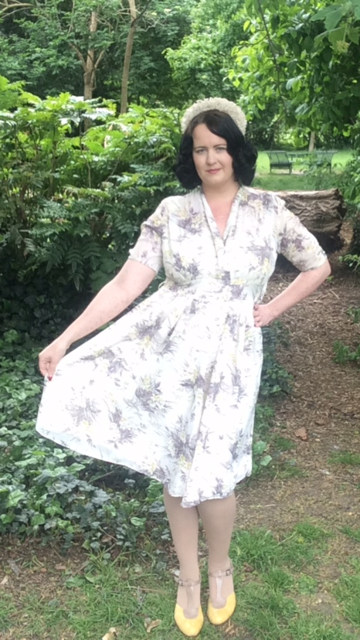
OOTD Summer Cotton Bootsale Find Dress

Today I took myself off to a vintage furniture flea (more on that on Wednesday) and as with all vintage events I decided to give a new dress a spin. 

I picked up this light cotton dress at a car boot sale a couple of weeks ago, although at £11.00 it was much more than I would usually pay but I fell in love with it - I know, I'm cheap!


This dress is very sheer so I wear a slip under it. I decided it was perfect for summer because it is short sleeved and is a little loose on my waist so I don't feel too restrained by it in the heat. 


The pattern of this dress really caught my eye with it's mix of floral and polka dots. It's so bright and cheery, perfect for the warmer weather! 


As well as it's slightly dropped waist detail another feature of this dress is the tie neck which someone complimented me on. I think it's a great feature, it's a nice vintage touch and means my chest is covered from the sun. 

I teamed this dress with these beautiful vintage earrings which I recently converted to posts, I picked these up in a charity shop. 


Of course I had to wear some bakelite so I selected a sunny stack of yellows and greens to coordinate with the print on the dress. 


I loved my yellow Hotter "Sandy" shoes so much I now have them in pink and black so I chose the pink pair to wear with this as I wanted to avoid an overload of yellow and they picked up the pink in the pattern nicely.  


As it is so hot there was only one option today and that was an updo. I decided to wear my peach coloured headscarf to keep the pastels theme going. I threw some victory rolls in the front and just did a french twist in the back which is covered by the scarf. 


 I hope you enjoyed this OOTD post and look forward to writing all about the gorgeous furniture finds on Wednesday.

Until next time
Love
Lucy
xx


Thursday, 15 June 2017

Cupcake Day - Raising Money for the Alzheimers Society

It is Cupcake Day for the Alzheimers Society today and I decided to do a cake sale at work. I made chocolate, lemon and vanilla sponges with buttercream toppings (vanilla and lemon)


A lady I remember very fondly from my childhood is my great Auntie Helen. Auntie Helen was always immaculate and as a young girl I remember thinking when I grew up I would be just like her and only ever wear suits and would have my hair done every day, my fond memories are always of her well put together look!

Sadly dementia took Helen a few years ago and that's why I decided to try to raise a few pounds in her memory.


Cupcakes (makes 12)

110g plain flour
110g caster sugar
110g butter
2 teaspoons baking powder
2 eggs
Vanilla/Lemon essence depending on the flavour sponge you want

*For chocolate cupcakes I substituted 10 g of flour for 30 grams of coco powder and added 2 tablespoons of water to the mixture

Icing
Butter
Icing sugar
(colours and flavours can be added to make any combination you want)

Cupcake cases
Cupcake tin


*Preheat the oven to 175 degrees

1. Place the butter and caster sugar into a bowl and mix together until fluffy

2. In a separate bowl gently whisk the eggs and essence

3. Add the flour and baking powder to the butter and sugar

4. Add the egg mixture and mix thoroughly until smooth

5. Place cupcake cases in a cupcake tin and equally divide the mixture between the cases

6. Put the tin in the oven for 18-20 minutes, avoid opening the door whilst baking

7. Remove the cupcakes from the oven and allow them to stand in the tin for a further 10 minutes

8. Buttercream - I do this by taste so start by sieving icing sugar into softened butter mixing as you go, just add enough icing sugar to create a stiff buttercream, tasting as you go. If you are adding essence or colourings do this a little at a time and taste along the way to avoid over flavouring.


I hope the Alzheimers Society raise lots of money for the cause this year 
Happy Cupcake Day to all! 

Until Next Time 
Love
Lucy 
xx


Wednesday, 14 June 2017

Felt Flower Fascinator - Craft of the Month

This months craft is a handmade felt fascinator.


Fascinators are currently known to be small headpieces often on clips or slide combs which are decorated and these days are very popular for weddings and celebrations instead of full hats.

However historically a fascinator was actually a snood type garment, often knitted or crochet which women wore in the 19th century and went out of fashion in the 1930's.

I'm making the more modern understanding of a fascinator this month since my knitting skills are slim to none!


I wanted something to go with my Seamstress of Bloomsbury Brenda dress that incorporate the lovely mix of colours, since that's quite specific it made sense to make my own. Fascinators can reach pricey money on the highstreet considering what they actually are!


Making a fascinator 

You will need:
  • Fascinator base, I got mine on ebay cheaply, you might also find things in charity shops that can be deconstructed 
  • Comb or clip to attach to the base
  • Felt 
  • Pencil 
  • Scissors 
  • Needle and thread 


1. Draw out your templates on to the felt, I like to get all the cutting done first so I drew out my flowers and cut them out. I decided to do some double petal flowers and some single.

Since the pattern on the dress doesn't have every flower a uniform shape I just drew the flowers free hand but you can easily find templates online to print out.


I also cut out some green leaves to tie in with the green in the dress and some blue strips of felt to make a kind of berry shape to put in between the flowers. If you look at the print it has these sort of aqua coloured berries. I tied the strips of aqua felt into knots and sewed them behind the flowers. 

2. Once you have cut out your flowers, play around with the placement on your fascinator base before deciding final placement, you want to work right up to the edge of the base so there appears to be some overhang and you cannot see the edges of the base.


3. Start to sew your design into place, if you go wrong there is nothing in this craft that cannot be easily undone! I am using a thick thread since the base of the fascinator has large holes in the mesh.


4. I sewed my flowers into place with a simple cross stitch, you could just as easily use a sequin, small bead or some lovely small buttons instead.


5. On the underside of the fascinator I decided the placement of my clip and carefully sewed it on.Be careful to make sure you are sewing the clip the right way. It might not be the neatest sewing in the world but as it's just for me I don't mind!


6. When pulling through the thread for the clip you have to be careful to avoid the flowers. However doing this process the other way around would make sewing the flowers much harder as you'd be working around the clip.

7. There you have it, a completely unique fascinator, you could make these to match almost anything with a little imagination for only a few pounds!


This project is easy to undertake and only requires very basic sewing and could be done in front of the TV!

I hope you enjoyed this post and look forward to next month when I'll be bringing you a 1940's felt brooch that you can make from the leftovers of this project, waste not want not!

Until Next Time
Love
Lucy
xxx


Monday, 12 June 2017

Make Up Revolution Retro Luxe Matte Lip Kit Review

Make Up Revolution.


I am a big fan of this brand, found in Superdrug. Their products are often described as "dupes" of more expensive products. They are budget friendly and really good quality for the price.

The Retro Luxe Matt Lip Kit caught my eye. It's definitely reminiscent of the Kylie lip kits so I decided to give them a trial. 


The lip kits are £6.00 each. There was a promotion on at the time, spend £12.00 and get a free palette. I decided to get 2 lip kits in Echelon and Glory.

Echelon is a pink nude colour and Glory is a very dark brown which I couldn't resist as I am a little late to the dark lipstick party but I love the more dramatic shades.

Couple of days later, based on the performance I picked up two more colours, Regal and Noble. This also meant I got another free palette! 
Performance

These lip kits come with a lip pencil and the matte liquid lipstick. The colours on the boxes are not true to the colours on the boxes so you'd definitely want to test them before buying.

The liner colours are generally pretty good, I personally think Echelon's liner is slightly off, it still looks nice but it is just one shade off the lipstick itself which I wasn't expecting. 

The liners are super creamy so they are really easy to put on and don't pull at your lips which is really lovely. 

Top to bottom: Glory, Regal, Noble and Echelon 

These do not dry down to a true matte, they are still a little sticky on the lips, I don't mind this since I usually find liquid lipsticks drying but if you're expecting a totally dry matte you won't get it with these. 

These liquid lipsticks do not budge easily so I could put a little chap stick over the top halfway through the day just to freshen it up. without it causing any patchiness or wear to the colour.  

These are difficult to get off because of the stay put formula, however they do budge with oil based products, or in my case just plain old olive oil. This does mean that if you eat anything oil based you will have to top up. 

All in all I am really happy with these for the price, they stay on well and are not too drying and the colours are rich, I used one coat. 

In terms of the freebies I got one lipstick palette and one eyeshadow palette.


I am mad about Revolution eyeshadows as they are really pigmented and this palette has a good mixture of mattes and shimmers, neutrals and darks. 


I choose this lipstick palette because I thought it would be a good opportunity to try out some colours I wouldn't normally go for and you get lots of options with this one. 


I always keep an eye on what Make Up Revolution are bringing out because they are a good brand for your pocket and regularly have great special offers. 

Until Next Time 
Love 
Lucy 
xx 

Thursday, 8 June 2017

Vintage Voting

I cannot help but post something about the elections today. Forget trial by media this has been trial by social media from my perspective. 

It is not my place to tell you how to vote but as an ex non-voter I do urge you to go to the polling station today. 


In 1918 Parliament passed an act granting the vote to women over the age of 30 who were householders, the wives of householders, occupiers of property with an annual rent of £5, and graduates of British universities. About 8.4 million women gained the vote.  (Source Wikipedia) 


And yet some people these days, including a huge majority of women, don't vote. Please exercise the rights that were sorely won for you. Today I was looking back at what passed for spin in times gone by, and it's all rather tame with not a pig or a wheat field in sight. 


Here's how they used to do it in the "good old days" 


If only we could afford homes with open fire places eh? 

Less tax? Not for the average person these days! 

It's always been about housing... 

Would this little lad be better off under the Tories? 

The concept of a team "May" have gone out the window! 

Ah sun ray treatment - for when you're running through those fields... 


If only tea duty was our main concern... 

A message as relevant then as it is now.. peace must prevail 

I hope you enjoyed this little vintage political round up and wish you a happy voting day whatever your preference. 

Until next time 
Love 
Lucy 
xx 


Thursday, 1 June 2017

Cleaning vintage - A Beginners Guide

Cleaning vintage is nothing to be scared of, that's been my lesson this month.

I bought this dress on eBay for £6.00. I really liked the simple pattern with the hints of yellow in the flowers, it was so cheap because it was in need of some love.

I had to consult my good friend Catherine's YouTube channel to remind myself of her instructions on cleaning a vintage dress.


The dress was sold as seen, it had some very old pins in the hem of the slip underneath which were threatening to rust. Other than taking the lining hem up and giving it a jolly good clean it didn't have any big issues so I decided to take it on as a project.


Cleaning a Vintage Dress - Beginners Guide.


1. Research - do some research online and know what you are dealing with. Most older dresses won't have care labels. Try and find out what you can about the fabric, this dress is nylon.


2. Repairs - check over the garment and do any repairs necessary before washing. Also check any shoulder pads and make sure they are not disintegrating.

I took out the pins, there wasn't anything to repair, I'll start the process of taking it up again once it's clean.


3. Soak the garment in cold water for a few hours. This will lift out the general grossness. This is the colour of vintage!


4. Empty out the groggy vintage water and replace with clean and add a mild detergent. I used this Aloe Vera cleanser from Forever Living because it doesn't contain any harsh chemicals, you can wash everything from your floors to clothes with it!


5. Give the dress a good wash, I use a sort of kneading motion to move the cleanser through the dress. You'll want to be gentle with more delicate items, you have to judge it by the item itself.


6. Leave to soak in the cleanser for a few minutes more then rise, I like to use a bucket filled with clean water, emptying and refilling the water as I go to make sure all the bubbles are gone.

7. Sometimes you can leave it at this but this dress still had that musty vintage smell so it needed a second wash. I put the dress inside a pillowcase, tied the pillowcase with a hairband and put the dress on a 400 spin cold wash with a non bio washing liquid.


8. Dry your item flat over a clothes horse, if vintage has weak fibres they can often be in the shoulders as a result of being hung for years so hanging it wet by the shoulders or waist is a bad idea.

9. Now the dress is dry it's time to iron it through a bedsheet so it doesn't get burnt.

10. The dress came out beautifully and I spent some time repinning it and taking it up for my height.


I wore the dress to the most recent North London Vintage Market Event with my new white vintage hat, link to the markets blog here 


You can see Vintage Frills brilliantly handy video taking you through all these steps here. I will definitely feel more confident in rescuing items in the future!

Until next time
Love
Lucy
Xx